Chapter 3: Visual schedule extension
Introduction
During the academic semester, students typically take several different modules with pre-defined times when they need to be at a specific location in person or online. At the start of the semester, most are given this initial timetable as a method of communicating these times for guidance. This defined structure can be very useful for students who find it difficult to carve up their workday.
Once the semester has started, each module will have several different assessment components spread across the semester. In some cases, times and dates are provided, in other cases they are sent as a byproduct of the teaching process emphasizing the student to work out their one timeline for the assessment deadlines and manage the workload themselves.
Many learners often have an issue with this process of assigning deadlines to not only the assignments when they are due but also to the smaller pieces of work that must be completed to finish individual assignments.
This chapter outlines from a development point of view what tools we can generate to help students manage and track the assignments they have, where they should be, and also the sub-components of work that need to be completed during the semester.
A complete working example of the Chrome extension can be found at the end of this chapter.
Where learning difficulties arise
When assignments are not turned in, often educators think the only reason is laziness on the part of the student as they consider their part of the deal upheld. In reality, missing deadlines can be a symptom of learning difficulties manifesting. Consider a student with autism who has the ongoing impact of hyperfocus. This process may cause the learner to unintentionally lose themselves in a task that may be irrelevant to the pressing deadlines that are looming in the background. This can also be seen with students who have ADD/ADHD. In contrast to the other example, the learner may be very aware of the deadline but cannot focus until they are in the very last few hours before an assignment is due.
Other learners with depression or anxiety may have difficulty finding motivation to start work, as often beginning a task is the most difficult when it is considered a complete unit. How we can help all these students by providing a method of structure and small bite-sized work components that seem a little less daunting to begin with. When smaller components are complete, the reward from this may encourage them to continue to the next component.
The core change that this chapter discusses is an answer to the question: What is a unit of work?
A unit of work can be considered a single block of time when the student is learning or working on an assignment or problem without distraction. A body of research has suggested that this is 40 minutes. After this time, the learner will need a short period to recalibrate before they move on to the next task in the line. For this reason, each class a student will take, which is commonly one or two hours, will be broken into a 40-minute work process followed by a 15-minute rest cycle. As this time changes between different students, an option exists to modify this to their needs.
In addition to this, whenever an assignment is given to the student, it will be associated with several hours required for the assignment to be completed. This number of hours is the total number of work hours with the additional rest time after each work process.
The estimation of time it takes to complete an assignment can be changed to suit each different learning environment.
Visualising module timetable chrome extension
To visualize a timetable, the core information that is needed includes:
- Title - Name for a given module or session
- Location - Where the work will be completed, e.g., a room location or online link such as Microsoft Teams.
- Teacher - Who is involved
- Time - What time is connected to this timeslot.
In the most simple form, the timetable given to a student defines the structure for their entire semester.
Self-study and recovery time
When considering this timetable, an element that is often missing is the number of additional hours that are required by the student to complete a module. Many students with learning difficulties have issues with time management, so these tools can be very beneficial to remind students about taking recovery time after periods of study.
Getting started
This example describes a Chrome browser-based extension that allows the learner to click a simple icon in their browser to pop open a window where they can view their timeslots. In future chapters, we will discuss the process of automating calendar entries where many different repeating modules need to be added.
Creating a folder for the extension
Before we begin the process of writing any code, we will take a step back and consider what files are required for this example and where they should be located.
The very first element we need to create is a blank folder that will contain the extension. As this is a browser extension, no additional HTTP server is required. On your desktop, create a folder titled visual_calendar. Inside this folder, we then need to add a file titled manifest.json that contains basic information about the extension and what permissions it will tell the users it requires.
Below are the files that are located in the visual_calendar folder:
/visual_calendar/calendar.html - This is the core HTML file that will be shown to the user when the icon is clicked.

/visual_calendar/popup.html - This is the HTML file the extension calls to trigger the extension to start.

/visual_calendar/popup.js - This file contains the JavaScript required to open a tab and load _calendar.html_.

/visual_calendar/main.js - This contains the core JavaScript for the calendar.

/visual_calendar/calData.js - Additional JavaScript for working with dates.

/visual_calendar/manifest.json - The main descriptor and permissions file.

/visual_calendar/calendar_icon.png - The icon we will see in the browser beside the address bar.
In the following sections, we will outline each of the files above in detail and how they work.
calendar_icon.png - A small icon that will be shown beside the address bar
We need to get a small PNG file that reflects what we are creating.
manifest.json - Description and permissions file
The first and most important attribute is the version of the manifest file we are using. There are vast changes between Chrome's V2 and V3. In our case, we will use the latest, 3. After this. we can add the basic extension information such as the name, description and version of our extension. When someone clicks the icon in Chrome, the first page that is called is the hello.html page. This is our default page to start the extension. After this, we can specify the icon that we want to use in PNG format under default_icon.
A core issue many people face when developing extensions is the permissions the extension should have. In our case, we want to use the tabs permission to allow us to open an HTML page in a tab in the browser as the core of our display. After this, the webRequest permission is available if we in the future want to make any API calls from our app and finally, the storage permission is added as we will need to save the data locally for the user.
{
  "manifest_version": 3,
  "name": "Visual Calendar",
  "description": "Extension",
  "version": "1.0",
  "action": {
    "default_popup": "hello.html",
    "default_icon": "hello_extensions.png"
  },
  "permissions": [
    "tabs",
    "webRequest",
    "storage"
  ]
}
File: popup.html
When a user clicks on the icon to open the extension, by default a small popup is used. This HTML outlines a template that will not be seen by the user, it is designed to make a call to the popup.js file that triggers the calendar.html file to open in a new tab.
<html>
  <body>
    <h1>Extension</h1>

  </body>
</html>


<script src="./popup.js" type="module"></script>
File: popup.js
popup.js is the core JavaScript to open the chrome tab with the calendar.html file ** Making the weekly calendar structure. There is very little additional content in this file as it serves as a trigger. A small log message is added to outline in our console that the icon in the menu has been clicked and it is triggering the calendar.html page to open.
console.log('In the popup!');


chrome.tabs.create({
    url: chrome.runtime.getURL("calendar.html")
});
File: calendar.css
To style the calendar that the user will see, a file titled calendar.css is created.
#boxes {
  content: "";
  display: table;
  clear: both;
}

#time_column {
  background-color: #FFFFFF;
  border-right: 1px solid black;

  float: left;
  height: 700px;
  width: 10%;
  padding: 0 10px;
}


#column1 {
  background-color: #FFFFFF;
  border-right: 1px solid black;

  float: left;
  height: 700px;
  width: 10%;
  padding: 0 10px;
}

#column2 {
  background-color: #FFFFFF;
  border-right: 1px solid black;

  float: left;
  height: 700px;
  width: 10%;
  padding: 0 10px;
}

#column3 {
  background-color: #FFFFFF;
  border-right: 1px solid black;

  float: left;
  height: 700px;
  width: 10%;
  padding: 0 10px;
}
#column4 {
  background-color: #FFFFFF;
  border-right: 1px solid black;

  float: left;
  height: 700px;
  width: 10%;
  padding: 0 10px;
}

#column5 {
  background-color: #FFFFFF;
  border-right: 1px solid black;

  float: left;
  height: 700px;
  width: 10%;
  padding: 0 10px;
}
#column6 {
  background-color: #FFFFFF;
  border-right: 1px solid black;

  float: left;
  height: 700px;
  width: 10%;
  padding: 0 10px;
}
#column7 {
  background-color: #FFFFFF;
  border-right: 1px solid black;

  float: left;
  height: 700px;
  width: 10%;
  padding: 0 10px;
}


#sessionBlock {
    text-align: right;
    height:30px;
    background-color:white;

}

div[id^="1sessionBlock_"]{
    text-align: right;
    height:30px;
    background-color:white;

}
div[id^="2sessionBlock_"]{
    text-align: right;
    height:30px;
    background-color:white;

}
div[id^="3sessionBlock_"]{
    text-align: right;
    height:30px;
    background-color:white;

}
div[id^="4sessionBlock_"]{
    text-align: right;
    height:30px;
    background-color:white;

}
div[id^="5sessionBlock_"]{
    text-align: right;
    height:30px;
    background-color:white;

}
div[id^="6sessionBlock_"]{
    text-align: right;
    height:30px;
    background-color:white;

}
div[id^="7sessionBlock_"]{
    text-align: right;
    height:30px;
    background-color:white;

}

#timeBlock {
    text-align: right;
    height:30px
}

h2 {
  color: #000000;
  text-align: center;
}
File: calendar.html - Creating the main UI
To display the calendar, we will create a new page titled calendar.html. This page is responsible for showing the user the current week and allowing them to add individual notes to time slots.
The first component in this file is a simple reference to the calendar.css file that we created earlier.
<!DOCTYPE html>
<html lang="en">

<link rel="stylesheet" type="text/css" href="css/calendar.css" />
Then we add in two simple spans, one titled currentMonth which will be used as a placeholder for the current month number and daysInMonth which is a placeholder to tell the user how many days are in the current month. Two buttons are then added as triggers to move the calendar forward a week and the other to move it back a week.
As the calendar is based on a number of different blocks of time, on the left of the calendar we have a div tag titled time_column that is used to store several div tags that contain the time from 8am in half-hour increments.
<div>Month: <span id="currentMonth"></span></div>
<div>Days in month: <span id="daysInMonth"></span></div>
<button id="previousWeek">Previous Week</button>
<button id="nextWeek">Next Week</button>
  <div id="column1">
    <h2>Time</h2>


    <div id="timeBlock">8am</div>
    <div id="timeBlock">8:30am</div>
    <div id="timeBlock">9am</div>
    <div id="timeBlock">9:30am</div>
    <div id="timeBlock">10am</div>
    <div id="timeBlock">10:30am</div>
    <div id="timeBlock">11am</div>
    <div id="timeBlock">11:30am</div>
    <div id="timeBlock">12pm</div>
    <div id="timeBlock">12:30pm</div>
    <div id="timeBlock">1pm</div>
    <div id="timeBlock">1:30pm</div>
    <div id="timeBlock">2pm</div>
    <div id="timeBlock">2:30pm</div>
    <div id="timeBlock">3pm</div>
    <div id="timeBlock">3:30pm</div>
    <div id="timeBlock">4pm</div>
    <div id="timeBlock">4:30pm</div>
    <div id="timeBlock">5pm</div>
    <div id="timeBlock">5:30pm</div>
    <div id="timeBlock">6pm</div>


</div>
Next week need to add individual columns for each of the days e.g., Monday to Sunday.
To do this, we will copy the below piece of HTML seven times. the only change that needs to be made is the number 1 is replaced with 2,3,4,5,6,7 for each other column. This column structure allows us to have one individual div block with a unique ID that is associated with each time slot. The first div block 1sessionBlock_1, would be associated with Monday at 8 am. The second div column, column2, would indicate Tuesday, with 2sessionblock_2 indicating 8 am on a Tuesday.
<div id="column1">
     <span id="1_date"></span>
    <div class="empty" id="1sessionBlock_1"> </div>
    <div class="empty" id="1sessionBlock_2"> </div>
    <div class="empty" id="1sessionBlock_3"> </div>
    <div class="empty" id="1sessionBlock_4"> </div>
    <div class="empty" id="1sessionBlock_5"> </div>
    <div class="empty" id="1sessionBlock_6"> </div>
    <div class="empty" id="1sessionBlock_7"> </div>
    <div class="empty" id="1sessionBlock_8"> </div>
    <div class="empty" id="1sessionBlock_9"> </div>
    <div class="empty" id="1sessionBlock_10"> </div>
    <div class="empty" id="1sessionBlock_11"> </div>
    <div class="empty" id="1sessionBlock_12"> </div>
    <div class="empty" id="1sessionBlock_13"> </div>
    <div class="empty" id="1sessionBlock_14"> </div>
    <div class="empty" id="1sessionBlock_15"> </div>
    <div class="empty" id="1sessionBlock_16"> </div>
    <div class="empty" id="1sessionBlock_17"> </div>
    <div class="empty" id="1sessionBlock_18"> </div>
    <div class="empty" id="1sessionBlock_19"> </div>
    <div class="empty" id="1sessionBlock_20"> </div>
    <div class="empty" id="1sessionBlock_21"> </div>
    <div class="empty" id="1sessionBlock_22"> </div>

</div>
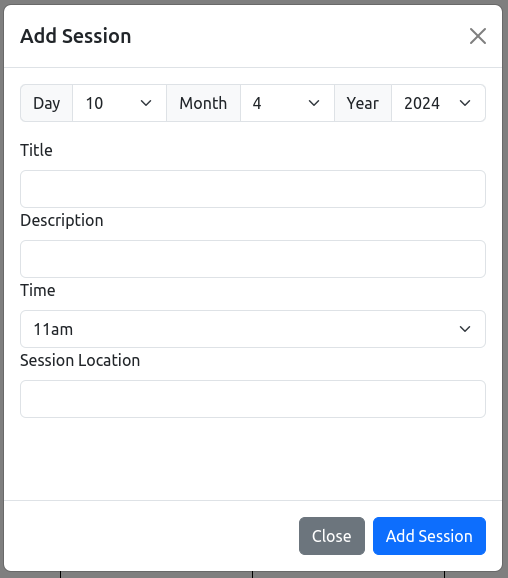
After the div columns have been created, we need to add a method of adding data to each individual time slot. When a user clicks on one of the time blocks, it will trigger a modal to open. This modal is a simple HTML Bootstrap Modal. In this modal we need to record the day, month and year of the time block that was clicked, the title we want to add, a brief description of the task the user will perform, the time the user chose and the location associated to the timeslot e.g., a classroom.
This modal has the ID set to exampleModal which will be referenced later to trigger the click to open the modal. A simple button is also added titled Close allowing the modal to be closed if it was opened in error.
  <div class="modal fade" id="exampleModal" tabindex="-1" aria-labelledby="exampleModalLabel" aria-hidden="true">
    <div class="modal-dialog">
      <div class="modal-content">
        <div class="modal-header">
          <h1 class="modal-title fs-5" id="exampleModalLabel">Add Session</h1>


          <button type="button" class="btn-close" data-bs-dismiss="modal" aria-label="Close"></button>
        </div>
        <div class="modal-body">
            <div style="height:400px">
After this, we will create an HTML select to allow to to insert the day, month and year associated with the time block the user wants to save.
The core element is the ID associated with each HTML select. They are sessionDay, sessionMonth and sessionYear.
<div class="input-group mb-3">
<span class="input-group-text">Day</span>

<select class="form-select" id="sessionDay" aria-label="Default select example">
<option value="1">1</option>
<option value="2">2</option>
<option value="3">3</option>
<option value="4">4</option>
<option value="5">5</option>
<option value="6">6</option>
<option value="7">7</option>
<option value="8">8</option>
<option value="9">9</option>
<option value="10">10</option>
<option value="11">11</option>
<option value="12">12</option>
<option value="13">13</option>
<option value="14">14</option>
<option value="15">15</option>
<option value="16">16</option>
<option value="17">17</option>
<option value="18">18</option>
<option value="19">19</option>
<option value="20">20</option>
<option value="21">21</option>
<option value="22">22</option>
<option value="23">23</option>
<option value="24">24</option>
<option value="25">25</option>
<option value="26">26</option>
<option value="27">27</option>
<option value="28">28</option>
<option value="29">29</option>
<option value="30">30</option>
<option value="31">31</option>
</select>
The month follows a very similar structure to the month selection process above.
<span class="input-group-text">Month</span>

<select class="form-select" id="sessionMonth" aria-label="Default select example">
    <option value="1">1</option>
    <option value="2">2</option>
    <option value="3">3</option>
    <option value="4">4</option>
    <option value="5">5</option>
    <option value="6">6</option>
    <option value="7">7</option>
    <option value="8">8</option>
    <option value="9">9</option>
    <option value="10">10</option>
    <option value="11">11</option>
    <option value="12">12</option>

    </select>
For the year, two options were entered in the select for the user to choose from, 2024 and 2025.
<span class="input-group-text">Year</span>
<select class="form-select" id="sessionYear" aria-label="Default select example">
    <option value="24">2024</option>
    <option value="25">2025</option>
    </select>
</div>
Next, the additional information is added in the form of sessionTitle, sessionDescription and sessionTime. The most complex of these is the HTML select option for picking the session time. The user will visually see a list from 8 am to 6 pm in half-hour increments. Associated to each of these time blocks is a number where 1 represents the very first time slot in a day and 21 indicates the very last timeslot in the day. This allows for simple processing of the timeslot in the future without worrying about timestamps.
<label for="formGroupExampleInput" class="form-label">Title</label>
<input type="text" class="form-control" id="sessionTitle" placeholder="">

<label for="formGroupExampleInput2" class="form-label">Description</label>
<input type="text" class="form-control" id="sessionDesc" placeholder="">

<label for="formGroupExampleInput2" class="form-label">Time</label>


<select class="form-select" id="sessionTime" aria-label="Default select example">
    <option value="1">8am</option>
    <option value="2">8:30am</option>
    <option value="3">9am</option>
    <option value="4">9:30am</option>
    <option value="5">10am</option>
    <option value="6">10:30am</option>
    <option value="7">11am</option>
    <option value="8">11:30am</option>
    <option value="9">12pm</option>
    <option value="10">12:30pm</option>
    <option value="11">1pm</option>
    <option value="12">1:30pm</option>
    <option value="13">2pm</option>
    <option value="14">2:30pm</option>
    <option value="15">3pm</option>
    <option value="16">3:30</option>
    <option value="17">4pm</option>
    <option value="18">4:30</option>
    <option value="19">5pm</option>
    <option value="20">5:30pm</option>
    <option value="21">6pm</option>
    </select>


<label for="formGroupExampleInput2" class="form-label">Session Location</label>
<input type="text" class="form-control" id="sessionLocation" placeholder="">
At the end of the modal, two buttons are presented to the user. The first is the Add Session** button which is later triggered by JavaScript to grab all the data from the modal and save it as JSON in the browser. A close button is also added to close the modal if desired.
</div>
</div>
<div class="modal-footer">
<button type="button" class="btn btn-secondary" data-bs-dismiss="modal">Close</button>
<button type="button" id="addSession" class="btn btn-primary">Add Session</button>
</div>
</div>
</div>
</div>
At the very end of this HTML file, four simple files are included. The first of these is the bootstrap CSS file. After this, the Bootstrap JavaScript file is included. After this, the main.js file is included which is responsible for the operations of the calendar. calData.js is responsible for generating the dates that will be plotted on the calendar.
<link href="bootstrap.min.css" rel="stylesheet"/>
<script src="bootstrap.bundle.min.js"> </script>
<script src="main.js"></script>
<script src="calData.js"></script>
Below we can see a full example of the Bootstrap modal which allows the user to enter the details about the timeslot they wish to add to the calendar. The core information that is collected during this process is the day, month, year and time associated with the timeslot. This data will be stored in JSON format in the browser and rendered whenever a particular day is shown.
File: main.js - Main JavaScript file.
The main.js file is the core JavaScript for the calendar and contains all the code related to the different components on the calendar and the modal being clicked. The first element added to this is a simple console.log() call to identify that the file has been loaded correctly. A simple array is then used to add in the number of days in each month. This will be used in the future during the date generation process.
JavaScript is then used to create the Bootstrap modal we created earlier in the calendar.html file. The ID associated to this was exampleModal which you can see here. An array is also used to store the different chunks that make up a week. This is used as often when a calendar is loaded, we may already be halfway through a week and the only days left in the current calendar day may be Wednesday to Friday. This is created later as a chunk. A simple call to getElementById() is then performed to get create a reference to the addSession button that was on the modal we created earlier.
When the button is clicked, it assumes the user has finished adding all the data to the modal. The next line we can see that a call to myModal.hide() was made to remove the modal from the screen.
// ------------------------------------------------
// Main.js
// ------------------------------------------------
console.log("Called main.js")
let daysEachMonth = [0, 31, 28, 31, 30, 31, 30, 31, 31, 30, 31, 30, 31]

var myModal = new bootstrap.Modal(document.getElementById('exampleModal'), { keyboard: false });
// when processing a month, each week will be a separate
// chunk in this array
let weekChunks = []


let button = document.getElementById('addSession');
button.addEventListener("click", () => {

myModal.hide();
Just before the modal is closed, the getElementById() selector is used to get a reference to each of the attributes entered by the user and to grab their values. To ensure we are correctly accessing this data before future processing calls to the log() function are made to print the values to the console.
Finally, a call is made to the saveNewSessionData() function that is responsible for taking the raw data and saving it as JSON in the browser.
// Get the values
  let day = document.getElementById('sessionDay').value;
  let month = document.getElementById('sessionMonth').value;
  let year = document.getElementById('sessionYear').value;
  let title = document.getElementById('sessionTitle').value;
  let desc = document.getElementById('sessionDesc').value;
  let time = document.getElementById('sessionTime').value;
  let location = document.getElementById('sessionLocation').value;

  // print for debugging
  console.log(day);
  console.log(month);
  console.log(year);
  console.log(title);
  console.log(desc);
  console.log(time);
  console.log(location);
  saveNewSessionData(day, month, year, title, desc, time, location);

});
This saveNewSessionData() function is the core component to save the new calendar record data to storage. Again to ensure the data has been received correctly, calls to the log() function are made for each of the values. The JSON.stringify() function is used to take the raw data and save it as a JSON for storage.
// -------------------------------------------
// Core function that will save all the current information from the dialog
// and save it into the local storage.
// -------------------------------------------
function saveNewSessionData(day, month, year, title, desc, time, location) {

  console.log("called saveNewSessionData()");

  console.log(day);
  console.log(month);
  console.log(year);
  console.log(title);
  console.log(desc);
  console.log(time);
  console.log(location);

  let peoplevar = "User";

  var value = JSON.stringify({
    "day": day, "month": month, "year": year, "title": title,
    "location": location, "time": time, "people": peoplevar
  });


  let startRecordNum = 0;
The process of saving the JSON to the browser is then performed.
  console.log("checking if first record created..")
  // check if calendar start number is logged
  chrome.storage.local.get(['start_record']).then((result) => {

    startRecordNum = result['start_record']

    console.log("Found start record " + startRecordNum)


    // if we have to record, make a new one..
    if (startRecordNum == 0 || startRecordNum == undefined) {
      console.log("no record, making a new one")
      chrome.storage.local.set({ ['start_record']: 1 }).then(() => {
        console.log("start_record saved");
        startRecordNum = 1;
      });

    }


    // increment the calendar counter variable
    startRecordNum = startRecordNum + 1;
    console.log("incremented record counter.." + startRecordNum)

    // save incrmented number
    chrome.storage.local.set({ ['start_record']: startRecordNum }).then(() => {
      console.log("start_record update saved");


      chrome.storage.local.set({ ['calendar_' + startRecordNum]: value }).then(() => {
        console.log("JSON Data is saved");

        plotThisWeeksEvents()


      });


    });


  });


}
// ------------------------------------------
// Pull all the data from the storage and load
// the JSON into memory.
// ------------------------------------------
function plotThisWeeksEvents() {


  for (var i = 0; i < 1000; i++) {
    let keyName = 'calendar_' + i;

    chrome.storage.local.get([keyName]).then((result) => {

      if (result[keyName] != undefined) {
        console.log("Value is " + result[keyName]);
        parseCalendarJSONRecord(result[keyName], keyName)

      }
    });

  }


}
// For each different record stored, if today is the same day
// we can add the record to the calendar.
//
function parseCalendarJSONRecord(recordContent, keyName) {
  console.log("Parsing calendar JSON")
  console.log("key " + keyName)


  let record = JSON.parse(recordContent)

  console.log(record.day)

  // get the current date range
  let mon = document.getElementById('1_date').innerHTML
  let tue = document.getElementById('2_date').innerHTML
  let wed = document.getElementById('3_date').innerHTML
  let thu = document.getElementById('4_date').innerHTML
  let fri = document.getElementById('5_date').innerHTML
  let sat = document.getElementById('6_date').innerHTML
  let sun = document.getElementById('7_date').innerHTML

  if(mon){
    mon = mon.split('-')[0]
  }
  if(tue){
    tue = tue.split('-')[0]
  }
  if(wed){
    wed = wed.split('-')[0]
  }
  if(thu){
    thu = thu.split('-')[0]
  }
  if(fri){
    fri = fri.split('-')[0]
  }
  if(sat){
    sat = sat.split('-')[0]
  }
  if(sun){
    sun = sun.split('-')[0]
  }

  let currentMonth = document.getElementById('currentMonth').innerHTML;
  console.log("CURRENT Month" + currentMonth)


  let month =record.month

  // check we are currently on the same month as the record.
  if(currentMonth == month){
      console.log("ON SAME MONTH")

      console.log("CHECKING " +record.day + " on the calendar");
      console.log("monday is " + mon)
      console.log("tu is " + tue)
      console.log("wed is " + wed)
      console.log("thu is " + thu)
      console.log("fri is " + fri)
      console.log("sat is " + sat)
      console.log("sun is " + sun)
      let time = record.time;
      let day = record.day


      console.log("day " + day)
      console.log("month " + month)
      console.log("timeslot " + time)
      if (record.day == mon) {
        plotToCalendar(1, time, keyName, record)
      }
      else if (record.day == tue) {
        plotToCalendar(2, time, keyName, record)
      }
      else if (record.day == wed) {
        plotToCalendar(3, time, keyName, record)
      }
      else if (record.day == thu) {
        plotToCalendar(4, time, keyName, record)
      }
      else if (record.day == fri) {
        plotToCalendar(5, time, keyName, record)
      }
      else if (record.day == sat) {
        plotToCalendar(6, time, keyName, record)
      }
      else if (record.day == sun) {
        plotToCalendar(7, time, keyName, record)
      }


  }
}
function plotToCalendar(weekNum, time, keyName,record){

        let currentElement = weekNum+'sessionBlock_' + time;
        let elem = document.getElementById(currentElement);

        elem.innerHTML = record.title
        elem.style.backgroundColor = "grey";
        elem.setAttribute("data", keyName)
        elem.classList.remove('empty');
        elem.classList.add('canDelete');
}
// Delete a single calendar entry
// based on the id.
function deleteLocalRecord(id) {
  console.log("deleting record: " + id)
  chrome.storage.local.remove([id]);

}
// General click listener to see if someone has clicked
// one of the time slots.
// allows people to delete and also add new.
function processClick(e) {

  let single = document.getElementById(e.target.id)

  // delete an existing block
  if (e.target.getAttribute('class') == 'canDelete') {

    let deleteResult = window.confirm("Delete record?");

    if (deleteResult) {
      deleteLocalRecord(single.getAttribute('data'))
      window.location.reload()
    }
  } else if (e.target.getAttribute('class') == 'empty') {
    //
    // Getting the current date and time and creating a popup.
    // to add a new block
    //
    let currentId = e.target.getAttribute('id');

    // get the day in 1-7 format, then get the date above.
    let currentDayNum = currentId.substring(0, 1);
    let currentSelectedDateNum = document.getElementById(currentDayNum+'_date').innerHTML;

    // remove the everything after the date e.g., 11-Tue, remove -Tue
    currentSelectedDateNum = currentSelectedDateNum.split('-')[0]
    console.log(currentSelectedDateNum)
    document.getElementById('sessionDay').value = currentSelectedDateNum;

    // Get the month
    let cMonth = document.getElementById('currentMonth').innerHTML;
    document.getElementById('sessionMonth').value = cMonth;
    // show the time selected
    let start = currentId.indexOf('k_')
    let jumpToTime = currentId.substring(start + 2, currentId.length)
    document.getElementById('sessionTime').value = jumpToTime;


    // clear any old text
    document.getElementById('sessionTitle').value = '';
    document.getElementById('sessionDesc').value = '';

    myModal.show();


  }
else if (e.target.getAttribute('id') == 'nextWeek') {
    console.log("forward 1 week")

    weekCount = weekCount + 1
    let mon = document.getElementById('1_date').innerHTML
    let tue = document.getElementById('2_date').innerHTML
    let wed = document.getElementById('3_date').innerHTML;
    let thu = document.getElementById('4_date').innerHTML;
    let fri = document.getElementById('5_date').innerHTML;
    let sat = document.getElementById('6_date').innerHTML;
    let sun = document.getElementById('7_date').innerHTML;

    // we are looking for one of the days containing the last day
    // of the month as the key to switch to the next month
    let lookingFor = daysEachMonth[currentMonthNumber];


    if (mon.includes(lookingFor) ||
      tue.includes(lookingFor) ||
      wed.includes(lookingFor) ||
      thu.includes(lookingFor) ||
      fri.includes(lookingFor) ||
      sat.includes(lookingFor) ||
      sun.includes(lookingFor)) {


      // delete old week chunks
      // and generate new ones
      weekChunks = []
      monthCount = monthCount + 1
      console.log("generating month chunks")

      currentMonthNumber++
      generateMonToSundayChunks(currentMonthNumber)
      document.getElementById('currentMonth').innerHTML = (month + monthCount)

      weekCount = 0

    }
    // main call to render the visual components
    loadThisWeek() // plot dates
    clearCalendar() // empty blocks

    plotThisWeeksEvents() // check what events need to be plotted.

  }
 else if (e.target.getAttribute('id') == 'previousWeek') {
    console.log("Back 1 week")

    weekCount = weekCount - 1


    if (weekCount == -1) {
      console.log("MOVE BACK A MONTH")

      // move month back
      currentMonthNumber = currentMonthNumber - 1;

      // update the month visually on the calendar
      document.getElementById('currentMonth').innerHTML = (currentMonthNumber)

      console.log("Making previous month chunks")
      weekChunks = []
      generateMonToSundayChunks(currentMonthNumber)

      // print the chunks we are working with in this calendar month
      for (let i = 0; i < weekChunks.length; i++) {
        console.log(weekChunks[i])
      }

      weekCount = weekChunks.length - 1;


    }


    loadThisWeek() // load the dates for this week
    clearCalendar() // remove this weeks data
    plotThisWeeksEvents() // check to see what we need to plot this week
  }

  else {
    console.log("not processing click")
  }

}
document.addEventListener("click", processClick)


//
// Before any new time blocks are plotted to the calendar
// to show that a time is reserved, we clear off the HTML and
// background colour.
function clearCalendar(){

  for(var col=1; col< 8; col++){
        for(var i=1; i< 23; i++){
          console.log("Clearing " + col+'sessionBlock_'+i)
          let singleBlock = document.getElementById(col+'sessionBlock_'+i);
          singleBlock.innerHTML = '';
          singleBlock.style.backgroundColor = 'white'
        }
  }


}
File: calData.js - Calendar date generator
Inside the calData.js file, the first step in the process is to get information about the current date, day, month, and the current day's name. The day name is the current date in three-letter format. After this, the selector is used to select the currentMonth span tag created earlier at the top of the calendar to drop in the current month in numeric format e.g., 1 for January.
To keep track of the weeks are are working on and the months, counter variables are created. A variable is then created to store the currentMonthNumber that changes depending on the month being viewed. a months array is created to store all the generated data relating to each month. At the end of this, a for loop is then used to fill the month array with empty data up to the current month to allow the current month to be addressed with the associated month number e.g., March is represented as a 3.
// ----------------------------------------
// calData.js
// ----------------------------------------

// get the current date info for reference
const date = new Date();
let day = date.getDate();
let month = date.getMonth() + 1;
var dayName = date.toString().split(' ')[0];


// update the UI with the current month
document.getElementById('currentMonth').innerHTML = month;


// Main vars to keep track of the current week
// this will go up and down 1 each time
// the week button is clicked to change the calendar.
let weekCount = 0;
let monthCount = 0;
let currentMonthNumber = month;

// all of the month arrays will be held in this array.
let months = [];

// fill the months with empty values so we can get
// 3 to be March etc in the array.
for(let i=0; i< currentMonthNumber; i++){
  months.push([])
}
The generateCalendarDatesData() function is designed to generate all the dates relating to a specific month. This process is done to ensure that each month stars on the correct day and not allow Monday to always be associated with the 1st day of a month.
In this each call to generateMonthDates() is performed for each month we wish to get the relevant days and dates for. The first call performed is passed in the current month, followed by a reference to the daysEachMonth array created earlier and a reference to the current month. If 2 was passed for the month variable, the daysEachMonth will return 28.
One single piece of data is returned from each call to the generateMonthDates() function, which is the day that the month ends. This is done so a month ends on a Friday, the first day of the next calendar month would be a Saturday. This variable is represented as lastDay and is passed into each subsequent call to the generateMonthDates() function.
//
// Generate the Day in three letter form, followed by date number.
//
function generateCalendarDatesData(){

    // This holds the number of days in each month
    // 0 is the first record so we can use 1,2,3 etc. for month numbers
    // Generate month data
    let lastDay = generateMonthDates(month, '', daysEachMonth[month]);
    lastDay = generateMonthDates(month+1, lastDay, daysEachMonth[month+1]);
    lastDay = generateMonthDates(month+2, lastDay, daysEachMonth[month+2]);
    lastDay = generateMonthDates(month+3, lastDay, daysEachMonth[month+3]);


}
The getTomorrowDay() function is a simple function that allows a day to be passed in e.g., Monday and the next day, or tomorrow, will then be returned. when Mon is passed as the value for today, then Tue will be returned. The same process of representing days as three letters is also performed here.
// ---------------------------------------------
// Given the first three letters of a day,
// return the next calendar day.
// ---------------------------------------------
function getTomorrowDay(today){

  let tomorrow = '';

      if(today == 'Mon'){
          tomorrow = 'Tue'
      }
      else if(today == 'Tue'){
          tomorrow = 'Wed'
      }
      else if(today == 'Wed'){
          tomorrow = 'Thu'
      }
      else if(today == 'Thu'){
          tomorrow = 'Fri'
      }
      else if(today == 'Fri'){
          tomorrow = 'Sat'
      }
      else if(today == 'Sat'){
          tomorrow = 'Sun'
      }
      else if(today == 'Sun'){
          tomorrow = 'Mon'
      }

      return tomorrow;
}
To tie these elements together, the generateMonthDates() function is called. This is responsible for generating individual months and the associated days in the month along with the correct date for each day.
Inside this function, an array is created to hold the month dates titled monthDates. If no lastDay was passed to the function, this would indicate that it is the first month we are generating. for this reason, we can push the current day number followed by a dash, followed by the current three letter dayName.
the variable tomorrow is then filled with the current day name for future reference and the counter is set as the current day + 1. When we are on our second month generation onwards, the else statement will be called and tomorrow is set as the last day that was passed to the function. After this we can begin the process of generating the rest of the dates.
// ---------------------------------------------
// For each different calendar month after the current
// month, this will generate the dates.
// ---------------------------------------------
function generateMonthDates(monthNum, lastDay, numberOfDays){
    console.log("month ----- "+monthNum)

    let monthDates = [];
    let tomorrow = '';
    // if we are on the current month, we need the current day.
    // if no last day, we are on the current month
    let counter = 0;
    if(lastDay == ''){
      console.log("no last day using "+dayName)

      //adding today
      monthDates.push(day+'-'+dayName)
      tomorrow = dayName;
      counter=day+1;
    } else {
        tomorrow = lastDay;
        counter=1;
    }
A simple for loop runs through the rest of the days in the month. Each time, it finds out what the following date is, and stores this data along with the current date number to the monthDates array.
When the counter reaches the numberOfDays variable, it would indicate that we are at the end of the month. For future calls, the lastDayWas variable is set. When future months are generated, this will be used as the starting point for the day name. At the end, all the monthDates data that were generated are added to the global variable titled months that we generated earlier waiting to be rendered to the calendar.
    // generate rest of the month dates and days
    for(counter;counter<numberOfDays+1; counter++){
        tomorrow = getTomorrowDay(tomorrow);
        monthDates.push(counter + "-"+tomorrow);

        if(counter==numberOfDays){
          lastDayWas = tomorrow;
        }
    }

    // store the dates in the main months array
    // for future reference
    months.push(monthDates)

    return lastDayWas


}
When viewing any calendar, a month never consists of a solid four week block, at the beginning of a month often their is only a few days left in the month e.g., Saturday Sunday, before the next calendar week begins. This is the same at the end of the month, often the last few days in the month could be grouped together and considered an extra week in a month.
For this reson, the process of generating week chunks is performed. Each chunk generally consists of Monday to Sunday, if there are any additional days left over, they are added into their own individual week chunk to be added to the calendar.
The first step in the process is to get the currentMonth and set it to be the data from the months array which is passed a reference to the current month number. After this, the visual span tag added earlier at the top of the calendar titled daysInMonth is updated to outline how many days the current month has.
After this, a loop is then started over each of the days in the current month. Whenever we find they three letter day Sun, this would indicate to us that we are at the end of a week. The tempWeek is then pushed off to the weekChunks array to be rendered later.
A small array titled tempWeek is added that is used to hold all the days we are currently processing and going to add to the current chunk of days. Whenever we have a normal day, but we are not at the end of a week, the day is added to the current tempWeek.
// break the month into smaller week length arrays
// mon-sun
// this is done once per month
function generateMonToSundayChunks(monthNum){

  console.log("------ Month changed, pulling raw dates for the month ----")
  currentMonth = months[monthNum]

  // update month visual on calendar
  document.getElementById('daysInMonth').innerHTML = daysEachMonth[monthNum]


  let tempWeek = []

    for(let i=0; i< currentMonth.length; i++){

        let currentElement = currentMonth[i];
        if(currentElement.includes("Sun")){
            tempWeek.push(currentElement)
            weekChunks.push(tempWeek);
            tempWeek = []
        } else {
          tempWeek.push(currentElement)

        }

    }
After this process, all the days will be added to individual week chunks. Any left over days need to then be processed and added into their own chunk. A loop is then used to calculate the total number of left over days. A loop is then used to add the left over days into a new week chunk titled leftOverChunk.
    //
    //get left over days to make a final chunk from
    //
    let total=0
    console.log("Week chunks")
    for(let wk=0; wk < weekChunks.length; wk++){
      console.log(weekChunks[wk])
      total=total+weekChunks[wk].length;
    }


    let leftOver = currentMonth.length-total;

    let leftOverChunk = []
    for(let i=total; i<currentMonth.length; i++){

        console.log("adding.." + currentMonth[i])
        leftOverChunk.push(currentMonth[i])
    }
As the chunk may contain for example, two additional days at the start, the rest of the days need to be left blank in the chunk. To do this, we first substract the total number of elements left over from 7 to find the totalElementsToCreate variable. a simple for loop is then used to add this number of blank elements to the leftOverChunk.
At the end of this process, the final leftOverChunk is then added to the original weekChunks array.
   let totalElementsToCreate = 7 - leftOverChunk.length;
   console.log("total elements.."+totalElementsToCreate)


   for(let i=0; i<totalElementsToCreate; i++){
      leftOverChunk.push(" ")
   }

    weekCount=0

   if(totalElementsToCreate != 7){
      weekChunks.push(leftOverChunk)
   }


}
This process often leaves us with four complete week chunks, and an additional half chunk that represents the left over days in the week.
The loadThisWeek() function is used for taking the raw date data and plotting it to the visual calendar columns. When the calendar first loads, we first need to find out how many missing days need to be plotted at the start of the week. This is done if we are starting on a Wednesday in a week and we do not want to allow people to enter data for the Monday and Tuesday columns on the calendar. We find out the total amount missing, then fill an array titled fillBlanks with blank data.
//
// Update the visual dates with the current week data
//
// weekCount global var is used to change the current week
//
function loadThisWeek(){

  console.log("loadThisWeek() ---------" + weekCount)

  // add missing days at start of a week as blank values
  // if we start on any day other than monday
  totalMissing = 7-weekChunks[weekCount].length
  fillBlanks = []

  for(var i =0; i< totalMissing; i++){
    fillBlanks.push(" ")
  }
After this, we attach the fillBlanks array onto the newArr that we are going to create using the weekChunks that were created earlier. The selector is then used to select the date span tags at the top of each column titled 1_date, 2_date etc. To get this date, the weekChunksArray is passed the current weekCount. The data for each date is extracted using the index 0,1,2,3 etc from the array.
   let newArr = fillBlanks.concat(weekChunks[weekCount])
   weekChunks[weekCount] = newArr;


  // update the dates visually
  let mon = document.getElementById('1_date').innerHTML = weekChunks[weekCount][0]
  let tue = document.getElementById('2_date').innerHTML = weekChunks[weekCount][1]
  let wed = document.getElementById('3_date').innerHTML = weekChunks[weekCount][2]
  let thu = document.getElementById('4_date').innerHTML = weekChunks[weekCount][3]
  let fri = document.getElementById('5_date').innerHTML = weekChunks[weekCount][4]
  let sat = document.getElementById('6_date').innerHTML = weekChunks[weekCount][5]
  let sun = document.getElementById('7_date').innerHTML = weekChunks[weekCount][6]


}
At the very end of this file, calls to the functions to generate the calendar dates, followed by the individual week chunks are performed. The current week is then plotted to the calendar, followed by each of the events of the current week.
// --------------------------------------------
// main call to actually generate days and dates.
// this is only done once
generateCalendarDatesData()

// these are called once for each month
generateMonToSundayChunks(currentMonthNumber)


// plot the current week to the calendar
loadThisWeek()

plotThisWeeksEvents()
Summary
This chapter guided us through the process of creating a HTML and JavaScript based calendar that can easily be placed inside a Google Chrome browser extension.
Complete example
The completed visual schedule Chrome extension can be accessed on GitHub https://github.com/Kylegoslin/InclusiveLearningTools/tree/master/visual_calendar_extension.